Tutorial
In this section, we will learn how to interact with the FirecREST’s API through a typical workflow. We assume you already have a user that has access to the machines and we want to run a simple simulation on one of the machines. The examples will be provided both in the form of a curl command and python code. The curl command will give you a more direct understanding of the parameters of each call and hopefully make it easier to try yourself, while the python code could be the base for a simple client, like the one that is developed here.
Important
For the python parts of this tutorial you will need python-3.6 or later.
We will cover the following workflow:
This way you can use the most common calls of the API but most importantly get an idea of how to use the reference and expand your client, according to your needs.
HTTP requests
FirecREST API is based on REST principles: data resources are accessed via standard HTTP requests to an API endpoint.
Every request is made of:
the endpoint or requested URL
the method (one of GET, POST, PUT and DELETE depending on the appropriate action)
the headers (metadata necessary for the request)
the body (form data, files to be uploaded, etc)
The necessary information for every call is passed through query parameters, the headers and the body of the request. You can find all the available API calls of FirecREST in the reference section and here is a quick overview of the methods:
Method |
Description |
GET |
Used for retrieving resources. |
POST |
Used for creating/updating resources. |
PUT |
Used for creating/updating resources.* |
DELETE |
Used for deleting resources. |
* The difference between POST and PUT is that PUT requests are idempotent. That is, calling the same PUT request multiple times will always produce the same result. In contrast, calling a POST request repeatedly have side effects of creating the same resource multiple times.
Similar to the requests, the response of FirecREST will consist of:
a status code
the headers
the body in json form
Here is a quick overview of the status codes and their meaning.
# |
Category |
Description |
1xx |
Informational |
Communicates transfer protocol-level information. |
2xx |
Success |
Indicates that the client’s request was accepted successfully. |
3xx |
Redirection |
Indicates that the client must take some additional action in order to complete their request. |
4xx |
Client Error |
This category of error status codes points the finger at clients. |
5xx |
Server Error |
The server takes responsibility for these error status codes. |
Testbuild
For the tutorial we are not going to connect to the FirecREST, but a test-build. The test-build is a set of containers that simulate the FirecREST API and it is composed of the following containers:
The Compute, Status, Storage, Tasks, Utilities and Delegation microservices as well as the API Gateway as they were described in the Overview section.
A cluster container, which is the machine that we will connect to instead of the CSCS machines (Piz Daint etc). The container has at this point only two users; test1 and test2. For the job management of the cluster it uses the Slurm job scheduler with version 19.05.4.
A minio container that will be used for the data transfers that are performed through the Storage microservice. The minio Object Storage is a cloud storage server compatible with Amazon S3, released under Apache License v2. It is different than the CSCS Object Storage service, which is based on OpenStack Swift, so some of the output of the calls might be slightly different. Nevertheless, this should not affect how your client handles the responses.
A taskpersistent container that is responsible for keeping a persistent record of the FirecREST’s tasks.
Obtain credentials
All the requests in the FirecREST API require authorization, in the form of an access token. This token allows you to make requests on behalf of the authenticated user and is provided by Keycloak. It has to be included in the header of all the API calls, but you should keep in mind that validation tokens usually have an expiration date and are short-lived.
FirecREST API will return helpful messages in case the access token is invalid or has expired.
Invalid token:
{
    "message": "Bad token; invalid JSON"
}
Expired token:
{
    "exp": "token expired"
}
To test the credentials we can use a simple call to the Status microservice. We can call the status/systems endpoint with a GET operation to get more information about the systems in which the user has access. The access token has to be included in the header.
$ export TOKEN=<token>
$ export FIRECREST_IP="http://148.187.98.88:8000"

$ curl -X GET ${FIRECREST_IP}/status/systems \
       -H "Authorization: Bearer ${TOKEN}"
import json
import requests

TOKEN = '<token>'
FIRECREST_IP = 'http://148.187.98.88:8000'

response = requests.get(
    url=f'{FIRECREST_IP}/status/systems',
    headers={'Authorization': f'Bearer {TOKEN}'}
)

print(json.dumps(response.json(), indent=4))
The response to this call will look something like:
{
    "description": "List of systems with status and description.",
    "out": [
        {
            "description": "System ready",
            "status": "available",
            "system": "cluster"
        },
        {
            "description": "System ready",
            "status": "available",
            "system": "cluster"
        }
    ]
}
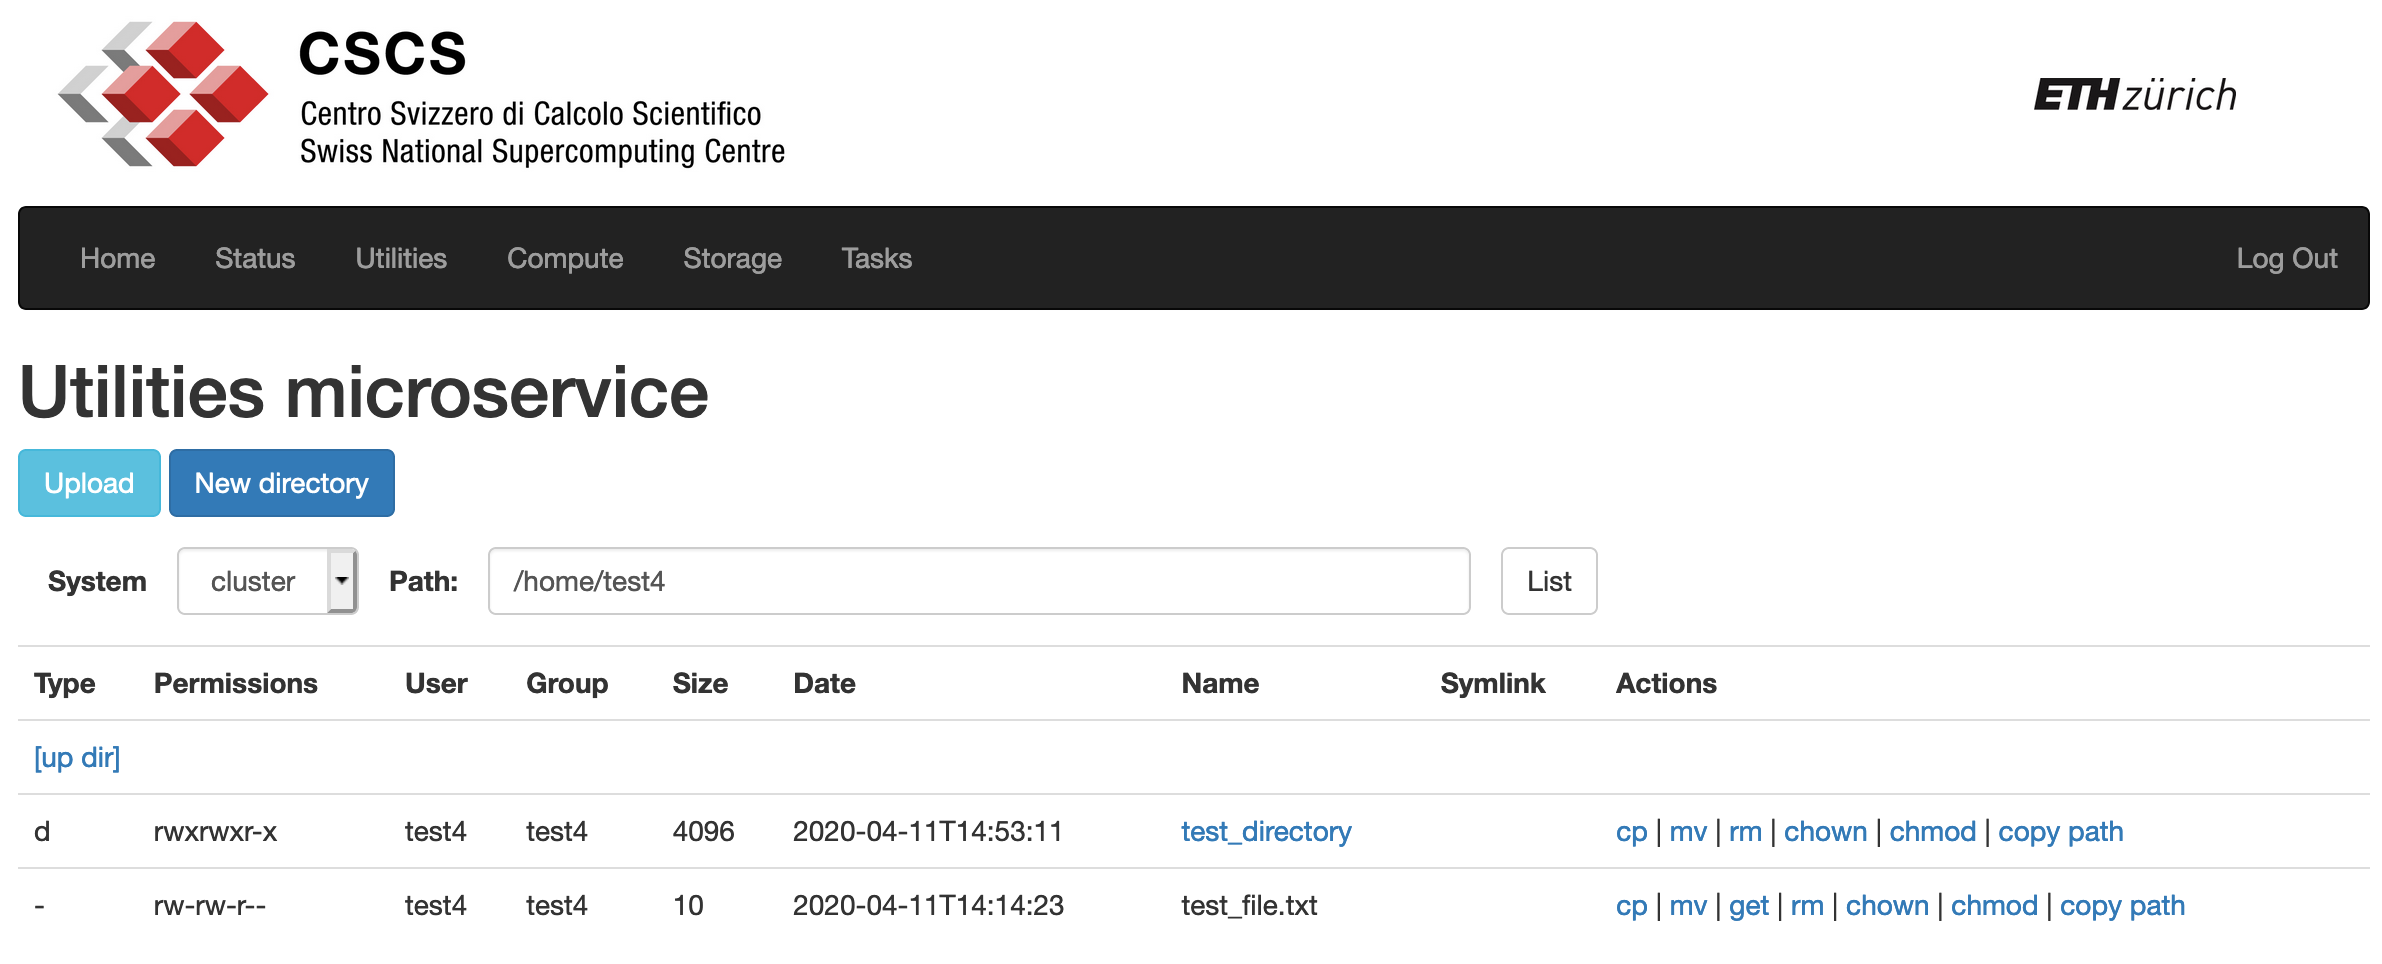
List the contents of a directory
Another simple but useful call of the API is the listing of the contents of a directory. As before we have to include the authorization token in the header but we also have to specify the machine name’s filesystem and the directory we want to list. In our example the machine is cluster and we want to list our home directory, /home/test4. As we can see in the reference section of utilities/ls, the machine name is also part of the header but the target path is a query parameter.
Note
Query parameters are passed in the params argument in python but are part of the URL in the curl command.
Finally, the call looks like this:
$ curl -X GET "${FIRECREST_IP}/utilities/ls?targetPath=/home/test4" \
       -H "Authorization: Bearer ${TOKEN}" \
       -H "X-Machine-Name: cluster"
targetPath = '/home/test4'
machine = 'cluster'

response = requests.get(
    url=f'{FIRECREST_IP}/utilities/ls',
    headers={'Authorization': f'Bearer {TOKEN}',
             'X-Machine-Name': machine},
    params={'targetPath': f'{targetPath}'}
)

print(json.dumps(response.json(), indent=4))
And the response should look something like:
{
    "descr": "List of contents of path",
    "output": [
        {
            "group": "test4",
            "last_modified": "2020-04-11T14:53:11",
            "link_target": "",
            "name": "test_directory",
            "permissions": "rwxrwxr-x",
            "size": "4096",
            "type": "d",
            "user": "test4"
        },
        {
            "group": "test4",
            "last_modified": "2020-04-11T14:14:23",
            "link_target": "",
            "name": "test_file.txt",
            "permissions": "rw-rw-r--",
            "size": "10",
            "type": "-",
            "user": "test4"
        }
    ]
}
When the call is successful the body of the response is enough, but in case we get an error the response header can give us more information about the error.
Note
To get the response header in the curl command add -i in the call. In python you have direct access to the response headers with response.headers.
In case we ask to list a directory in which the user doesn’t have the right permissions we will get X-Permission-Denied: User does not have permissions to access machine or path.
HTTP/1.1 400 BAD REQUEST
Content-Type: application/json
Content-Length: 49
Connection: keep-alive
X-Permission-Denied: User does not have permissions to access machine or path
Server: Werkzeug/1.0.0 Python/3.6.8
Date: Tue, 24 Mar 2020 09:21:03 GMT
X-Kong-Upstream-Latency: 168
X-Kong-Proxy-Latency: 2
Via: kong/2.0.2

{
    "description": "Error listing contents of path"
}
But when we try to list a directory that doesn’t exist the error would be different in the header.
HTTP/1.1 400 BAD REQUEST
Content-Type: application/json
Content-Length: 49
Connection: keep-alive
X-Invalid-Path: /home/test23 is an invalid path
Server: Werkzeug/1.0.0 Python/3.6.8
Date: Tue, 24 Mar 2020 09:27:44 GMT
X-Kong-Upstream-Latency: 172
X-Kong-Proxy-Latency: 2
Via: kong/2.0.2

{
    "description": "Error listing contents of path"
}
In the reference section of utilities/ls you can see more error types you can get in the response header.
The demo client uses the json response and displays the contents of a directory in a more user-friendly way, as shown in the next figure.
Upload a small file with the blocking call
Now we that you are familiar with the basic format of the calls we can move to something that is necessary in a typical workflow, uploading the input files to the machine. Many times the input can be a small file and for these cases the non-blocking call utilities/upload should be enough. As before, we need to specify the machine and the authorization token in the header of the call, as well as the location of the file we want to upload and the location in the machine. The path to the file corresponds to a local path, while targetPath is in the machine.
Note
Notice that targetPath is not a query parameter like in utilities/ls, but form data. In the curl command we have to use -F “targetPath=/home/test1” and in python it is part of the data dictionary.
$ curl -X POST "${FIRECREST_IP}/utilities/upload" \
       -F "targetPath=/home/test4" \
       -H "Authorization: Bearer ${TOKEN}" \
       -H "X-Machine-Name: cluster" \
       -F "file=@/path/to/input_file"
targetPath = '/home/test4'
machine = 'cluster'
localPath = '/path/to/input_file'

response = requests.post(
    url=f'{FIRECREST_IP}/utilities/upload',
    headers={'Authorization': f'Bearer {TOKEN}',
             'X-Machine-Name': machine},
    data={'targetPath': targetPath},
    files={'file': open(localPath, "rb")}
)

print(json.dumps(response.json(), indent=4))
As we already mentioned this call is blocking, so it will finish when the uploading completes or if it fails. For a successful uploading the body of the response will look like this:
{
    "description": "File upload successful"
}
In case the targetPath is wrong or the user doesn’t have the right permissions for the target location the response will look like this:
<!DOCTYPE HTML PUBLIC "-//W3C//DTD HTML 3.2 Final//EN">
<title>500 Internal Server Error</title>
<h1>Internal Server Error</h1>
<p>The server encountered an internal error and was unable to complete your request. Either the server is overloaded or there is an error in the application.</p>
You can see the steps for the upload in the slides that follow:
Run a small simulation
Our simulation is going to be a simple SHA-1 calculation of the file we uploaded in the last call. You can use this script for the job submission:
#!/bin/bash

#SBATCH --job-name=test
#SBATCH --output=/home/test4/res.txt
#SBATCH --ntasks=1
#SBATCH --time=10:00

sha1sum /home/test4/input_file
Submit a job
Before submitting our first job it is important to distinguish between two IDs, slurm’s job ID and FirecREST’s task ID. On a job scheduler like Slurm, every job has a unique job ID, which is created when a job is submitted and can be used to track the state of the job. With calls like squeue and sacct the user can see the state of the job (RUNNING, COMPLETED, etc.) as well as get information for the job. Similarly, for every task FirecREST will assign a task ID with which the user can track the state of the request and get information about it.
You can see the steps in the slides that follow:
The first step to submit a job is to make a POST request in the compute/jobs/upload endpoint. Again, we have to pass the authorization token and the machine in the header. The file this time will be the script we want to run with slurm and the location of the file is in our local filesystem.
$ curl -X POST "${FIRECREST_IP}/compute/job/uploads" \
       -H "Authorization: Bearer ${TOKEN}" \
       -H "X-Machine-Name: cluster" \
       -F "file=@/path/to/script.sh"
machine = 'cluster'
localPath = '/path/to/script.sh'

response = requests.post(
    url=f'{FIRECREST_IP}/compute/jobs/upload',
    headers={'Authorization': f'Bearer {TOKEN}',
             'X-Machine-Name': machine},
    files={'file': open(localPath, 'rb')}
)

print(json.dumps(response.json(), indent=4))
The expected response should resemble the following:
{
    "success": "Task created",
    "task_id": "af516f55496faf473d3bcaa042c52431",
    "task_url": "http://148.187.98.88:8000/tasks/af516f55496faf473d3bcaa042c52431"
}
- – tip::
You don’t have to submit the job script from a local file, you could also use the compute/jobs/path endpoint and submit a jobscript that is already in the machine’s filesystem.
Note
You have to keep in mind the task_id is not Slurm’s job ID but an ID for the task that was created with FirecREST and we will use that to keep track of the job submission request.
In order to get the status of the job that we submitted we have to make a GET call in the /tasks/{taskid} endpoint. The task ID is a path parameter and should be included in the URL. The response from the last call has the task ID in a field, as well as the completed URL.
$ curl -X GET "${FIRECREST_IP}/tasks/af516f55496faf473d3bcaa042c52431" \
       -H "Authorization: Bearer ${TOKEN}"
taskid = 'af516f55496faf473d3bcaa042c52431'

response = requests.get(
    url=f'{FIRECREST_IP}/tasks/{taskid}',
    headers={'Authorization': f'Bearer {TOKEN}'}
)

print(json.dumps(response.json(), indent=4))
The response should look like this if the job submission was successful:
{
    "task": {
        "data": {
            "jobid": 2,
            "result": "Job submitted",
            "job_data_err": "",
            "job_data_out": "",
            "job_file": f"/path/to/firecrest/af516f55496faf473d3bcaa042c52431/script.sh",
            "job_file_err": f"/path/to/firecrest/af516f55496faf473d3bcaa042c52431/slurm-2.out",
            "job_file_out": f"/path/to/firecrest/af516f55496faf473d3bcaa042c52431/slurm-2.out",
        },
        "description": "Finished successfully",
        "hash_id": "af516f55496faf473d3bcaa042c52431",
        "last_modify": "2020-04-11T15:37:04",
        "service": "compute",
        "status": "200",
        "task_url": "http://148.187.98.88:8000/tasks/af516f55496faf473d3bcaa042c52431",
        "user": "test4"
    }
}
In the field labeled data, we can see the information about the slurm job. You can get Slurm’s job id as well as the status of the submission, which in this case was successful. You can also get the path of the output and error files from the jobs (job_file_out and job_file_err) as well as the content of the file at the time of the submission. Since the jobs was just submitted, the files will most likely be empty. The rest of the fields are about the FirecREST task.
Tip
If you want information for all the past FirecREST tasks you can repeat the last call but without the task id, in the /tasks endpoint.
Check for job status
Now that we know the job’s slurm ID we can use it to get more information on the progress of that job. The /compute/jobs/{jobid} endpoint is going to start a FirecREST task for that purpose. The job ID is a path parameter, so part of the endpoint URL, and the authorization token and machine name are part of the header.
$ curl -X GET "${FIRECREST_IP}/compute/jobs/2" \
       -H "Authorization: Bearer ${TOKEN}" \
       -H "X-Machine-Name: cluster"
jobid = 2
machine = 'cluster'

response = requests.get(
    url=f'{FIRECREST_IP}/compute/jobs/{jobid}',
    headers={'Authorization': f'Bearer {TOKEN}',
             'X-Machine-Name': machine}
)

print(json.dumps(response.json(), indent=4))
And the response should look like that:
{
    "success": "Task created",
    "task_id": "00d1b7f1d8c37078371423de9108fd8e",
    "task_url": "http://148.187.98.88:8000/tasks/00d1b7f1d8c37078371423de9108fd8e"
}
Attention
The response will inform us that the task was created but not give any information from slurm. It will only provide a task ID, which we have to check with a new call.
So using the task ID from the response we have to make a new /tasks/{taskid} call.
$ curl -X GET "${FIRECREST_IP}/tasks/00d1b7f1d8c37078371423de9108fd8e" \
       -H "Authorization: Bearer ${TOKEN}"
taskid = '00d1b7f1d8c37078371423de9108fd8e'

response = requests.get(
    url=f'{FIRECREST_IP}/tasks/{taskid}',
    headers={'Authorization': f'Bearer {TOKEN}'}
)

print(json.dumps(response.json(), indent=4))
While the job is active the call will be successful and the output will look something like that:
{
    "task": {
        "data": {
            "0": {
                "jobid": "2",
                "name": "script.sh",
                "nodelist": "cluster",
                "nodes": "1",
                "partition": "part01",
                "start_time": "4:14",
                "state": "RUNNING",
                "time": "2020-03-17T09:08:01",
                "time_left": "25:46",
                "user": "test4"
            }
        },
        "description": "Finished successfully",
        "hash_id": "00d1b7f1d8c37078371423de9108fd8e",
        "last_modify": "2020-03-17T09:12:15",
        "service": "compute",
        "status": "200",
        "task_url": "http://148.187.98.88:8000/tasks/00d1b7f1d8c37078371423de9108fd8e",
        "user": "test4"
    }
}
The slurm information is in the “data” field of the response.
If you ask for information for a slurm job had finished for some time you will get something like this:
{
    "task": {
        "data": "slurm_load_jobs error: Invalid job id specified",
        "description": "Finished with errors",
        "hash_id": "00d1b7f1d8c37078371423de9108fd8e",
        "last_modify": "2020-04-11T15:42:28",
        "service": "compute",
        "status": "400",
        "task_url": "http://148.187.98.88:8000/tasks/00d1b7f1d8c37078371423de9108fd8e",
        "user": "test4"
    }
}
Note
The /compute/jobs/{jobid} call uses squeue so it doesn’t have information for old jobs. It will return an error for old job IDs.
Tip
If you want information for all the current jobs on a machine you can repeat the last call at the /compute/jobs endpoint, but without the task id.
Sacct call
If you want accounting information for older jobs you can use the /compute/acct, which is using the /sacct slurm command. It will display accounting data for all jobs and job steps in the Slurm job accounting log or Slurm database.
Here is an example of how to use it:
$ curl -X GET "${FIRECREST_IP}/compute/acct" \
       -H "Authorization: Bearer ${TOKEN}" \
       -H "X-Machine-Name: cluster"
machine = 'cluster'

response = requests.get(
    url=f'{FIRECREST_IP}/compute/acct',
    headers={'Authorization': f'Bearer {TOKEN}',
             'X-Machine-Name': machine}
)

print(json.dumps(response.json(), indent=4))
From the response you can get the task ID, as before:
{
    "success": "Task created",
    "task_id": "8c1ebced0d813f601b11744f0e16c40e",
    "task_url": "http://148.187.98.88:8000/tasks/8c1ebced0d813f601b11744f0e16c40e"
}
curl -X GET "${FIRECREST_IP}/tasks/8c1ebced0d813f601b11744f0e16c40e" \
     -H "Authorization: Bearer ${TOKEN}"
taskid = '8c1ebced0d813f601b11744f0e16c40e'

response = requests.get(
    url=f'{FIRECREST_IP}/tasks/{taskid}',
    headers={'Authorization': f'Bearer {TOKEN}'}
)

print(json.dumps(response.json(), indent=4))
The final response of should look like this:
{
    "task": {
        "data": [
            {
                "jobid": "2",
                "name": "test",
                "nodelist": "cluster",
                "nodes": "1",
                "partition": "part01",
                "start_time": "2020-04-11T15:37:04",
                "state": "COMPLETED",
                "time": "00:00:00",
                "time_left": "2020-04-11T15:37:04",
                "user": "test4"
            }
        ],
        "description": "Finished successfully",
        "hash_id": "8c1ebced0d813f601b11744f0e16c40e",
        "last_modify": "2020-04-11T15:51:15",
        "service": "compute",
        "status": "200",
        "task_url": "http://148.187.98.88:8000/tasks/8c1ebced0d813f601b11744f0e16c40e",
        "user": "test4"
    }
}
You can optionally specify the time period for this call’s results.
Job output
When FirecREST submits a job on behalf of the user a directory, named firecrest, will be created in the $HOME directory of the user. The subdirectories of this will be named after the task ID of the job submission and the user can see there the job script that was used for the submission as well as the output file(s) if their location is not specified.
Important
When using the FirecREST on the CSCS machines, this directory will be on $SCRATCH instead of $HOME. You can find more information about what $SCRATCH is and the different filesystems of CSCS here.
Upload with non-blocking call something bigger
For uploading small files the blocking call that we used in a previous section is enough. When the file we want to upload to a machine’s filesystem is bigger than 5MB, we need to use the Storage microservice. This task will be split into more steps but it will correspond to one FirecREST task, so we have to keep track of one task ID.
The first step is to upload the file to a staging area. As soon as this finishes, we have to make a call to FirecREST in order for it to move the file from the staging area to the location in one of the eligible machines’s filesystem.
So the first step is to send a request to FirecREST, to the /storage/xfer-external/upload endpoint. Besides the authorization token, we have to include the local path of the file we are going to upload (sourcePath) and the target location of the transfer (targetPath). Both sourcePath and targetPath are form data parameters.
$ curl -X POST "${FIRECREST_IP}/storage/xfer-external/upload" \
       -H "Authorization: Bearer ${TOKEN}" \
       -F "targetPath=/home/test4" \
       -F "sourcePath=/path/to/file"
targetPath = '/home/test4'
sourcePath = 'path/to/file'

response = requests.post(
    url=f'{FIRECREST_IP}/storage/xfer-external/upload',
    headers={'Authorization': f'Bearer {TOKEN}'},
    data={'targetPath': targetPath,
          'sourcePath': sourcePath}
)

print(json.dumps(response.json(), indent=4))
It FirecREST task was created succesfully we should get something like this:
{
    "success": "Task created",
    "task_id": "455c7c5f4910939fb502194a45d6914d",
    "task_url": "http://148.187.98.88:8000/tasks/455c7c5f4910939fb502194a45d6914d"
}
Afterward, we have to check on the task with the /tasks/{taskid} call that we have already seen.
curl -X GET "${FIRECREST_IP}/tasks/455c7c5f4910939fb502194a45d6914d" \
     -H "Authorization: Bearer ${TOKEN}"
taskid = '455c7c5f4910939fb502194a45d6914d'

response = requests.get(
    url=f'{FIRECREST_IP}/tasks/{taskid}',
    headers={'Authorization': f'Bearer {TOKEN}'}
)

print(json.dumps(response.json(), indent=4))

# You can isolate the "command" field, that holds the useful information
print(response.json()['task']['data']['msg']['command'])
And the task’s status description now should be “Form URL from Object Storage received” and look like that:
{
    "task": {
        "data": {
            "hash_id": "455c7c5f4910939fb502194a45d6914d",
            "msg": {
                "action": "wget -q -O /home/test4/input_file 'http://148.187.98.88:9000/test4/455c7c5f4910939fb502194a45d6914d/input_file?X-Amz-Algorithm=AWS4-HMAC-SHA256&X-Amz-Credential=storage_access_key%2F20200411%2Fus-east-1%2Fs3%2Faws4_request&X-Amz-Date=20200411T163746Z&X-Amz-Expires=604800&X-Amz-SignedHeaders=host&X-Amz-Signature=fe2c2a08208a3685ac7f07807b744c06fb60eafb0e79717045f49a547672f11e'",
                "cert": [
                    "gAAAAABekfJamesW2QEhF-s2nvCnPIolMJyfe4hRasZALAj8ldevpHdEhx6h4nIG9iO3gA46hJndpfTC6YlF1QxDHdg1cRQmx2HaIWtHHrvsN_hrFmQOznXJUAzDSRFsN-9Aw2MfTlDRUwD7p1mxbyx4PozIY2W7rSq8YFM_8FZL-P5rMV_fOWaJxS6lEFxOoTWxQuKGEF2Q6GP_Bv3QSYy0F7LsdhlKwMlCFCTKeHD-RjP4M_Z5YOBfIHqbxi7FsYPZ1WJz4mmaBU3ukQps_vDdZzVm8BB-dEyoRRBv3ynK3gFWZv8Ew6iPYTp1SnnzeX2Y1EoglGjqQmPE_cjn6K-BbQ4-c8rUEUle0bPm6OHOsRIX707SbfZB78p0OPyppG_B8XLQhJiMgzvrT11Rhn2ntUiFKOIZBWyihHbNCkk4jIsAEzAqyG0zLLqXBlqrSCX4DoKQQmV5YvFAi2A3tjfp_4qwdCKWiDImia81mdz9451qUr_oFtjB2OpZQiqBCChchisBDVRLUI7Moi3I4ZhwjXsxywUKs-Y3I7FrZfQSahuUlHwzc-QQIt5od8jeJ2mCd7OMVbjIvcngpIpxssLp9vKBUluAn8IV8CAHlmwO0OHoTDnN7xYIlyyHOxhRDzJeJgniNKxuGDCKTwYEezByRFSd5khNIxjn_coAyN--y6scHbICV_8s6pZ6EP5hrvYHup5nZaWFl7HIGpnHZdJV0V7qKog1Pb97HCU16gypcb_m2DMd0z98h5T8s3wmu6o4lh3YtvliHk1yG6TZYyad5W1ueqOo_phshthFHkcQVYU3IOM1TLC2lvYIVMS9XQLrD6cBU8Kam7rlTyH_0Zl538G_v34SzW3rXM-zJ4BCw0hMn6YzqxqeMUwf5alicu1iEvQqB453XHfYQoJWU3t-50Y8KxlLAMrjDFeo2jYr-bQpw8jlRIzfFJxG77vhGq4c_uLg4z68md1JEgIn-EgrkgJGAOA5sZbTkhZU1v4UCmJRX9zQdm54KRU00ScE5mIPRzQzbWIyxEcIVtAT3WuF0m6-wNColg8CYZyicoB4VtRriQlIVUNLJx6acT80I-I3kNKbQycC79_BmQyOM8_J3atbv4uPTtDXo7dgCb4fZoJ7eassGbF3-iZduWfnZAClQH78W-o7lWhblh4hFZDJN6QLwVMdujZsgjMfIrh7mDp_h3wt22_Ha2w64AFEXUDyB4t4dhQMA13HFlAn5rOH1Qu1Eti1Fcwo7tzxcUmgNq9_SUczhZMe3cbM515I_LjJPgJHqQQXo9Fty8Rz4Ex-o4bZRPX3FzaJWmRAaLIub_dtSmJBDDCMX__YA_Ddcb9afKB-v3nFrueP2QBpqa2a_JbVKXOch7nZU6UOYBZBl9-ZvLWUcO3ClEKxyM3Edz_sMc2mBUsWS9y1Pff0iIQK-t2MHeCOfm70Mj3lykij5FEpB8eRdxOFAytf0raCYegteodrmVbBkQQg_NQtTN3BncNWkKzKjB_1bRvZCEfgenMNdEy_AIu-vdKU7cyX6R50ui4f2s799utj0fS4H5rpxX3P5MzlkoPt96d5R7tidq7VibBMPiNZdRrcM1lV9Bu9JqQVP7cfNPIfywsp8YC1_QfXhM8aXQsQHIxZbxXTqH_AuB1GqllDn4kf5EWHbOp84tPptOKfoGiNUWjMM1FtBJkquRqMJ2O9ezoQmuwYh-ku5mcvEFE0jd9YKbHWd4VQEyPmKdJuLKYcycF0hWMns7hZJGWEBeZq_fJx7PtZaVjM9oMJqwKsaUBYfQ-3lYdKg1sWGFziMY_Tmx9AHkWyZOeKmZWaqL4EZjas33_Aj243zlVUPg3UWQY17GB98pJwefCYcze8WmIuXLyHeHcAFCM2la9rDbf58a1m_4ohuOBOdzg6EyDF3p5hg_a_Pt89sCHrUx1PsMgcTG4Pqdxyc7pUohPQiADhh0s8_BgGlBbk3u_NZ9q3O8bmW74_jvkt2NV2ReMucxnZhkxboNZ5eqwRsuqqjXtSbcSWsaAxiB9B1QmzG2jJVebjPTxp7TVvryqYgFmeTmnwyT5PghFqOQBs2jLeNSddRR2ysyu3Ozd6QXoBoDP7M7htOmEJVD-nSTlDVMvRctNGs4VZ5JGvSh3yKToJt2zdBwR-3XSYNHdGJWD04SFvVl35XEjiD_Ceb8Rdr4fFiwCB-VAaXynydfiacJsz2N4Gq5NgN0aCvgLuyl1E7qej_Ar9i6B0BzuiRZlTM3lag0bK10YGw-R0MP-EULXPjky75vzEvBTNRm6TN9XUqjZpm2kQMABVzQonGGToG-rphe3pLtJ8iu8wDMgK0A0y9NhO0rXOT5zU-ZNJFy3Ja7FPb33Sox2H9jgEVPpmGv1bZ_3HMRMb43MTNMX7wfNv7McDe6LMoAJlRaJYDlmDAHx7oNg0dRw7WeK97s4ghStga--9-RENAQQ6mMsYQMwzVkvzkUuEf3lWsol12hKXOexAv4hhjv62NyuZjOsCihWIcOpGla1ADMKJlx91Nzj-9wKWrGKnaBssv3vtUVq88vUoSkx9svKAER9MMz11fOq8LQKSXKBxTgMkagKqbtyZyC00dYLFRNWElTHEVSW-RvuNR8ZG1Ge6-yHXR6JZ2XLZclDJVQg8Q1ldzxoctRwJorFOUxxMzRBymiLNblCt2z3NRJ14re9BVcDtC1sYZDzdfcTaCnBCB9NeI1Ol9Kd_lq_assSX0d7CJWXuXvHuzDBphfhb3vhAwYdk4rQseATR5Gn2n7fUzcamL-vg-XnSEBm3a9CRjU9fnC-mfQOb3YVSS4LF2-POs_2OQxuRgONztj_dBtrTGtQrbcMiDqn4hiJ6Cp8qFyG1Z7qtxjTVQo_mm99Pc_4sT5I610Fn-kp_eVKQ8DEhym7PbCDZ0CCByJT4vv-tlu4o0FOKsEU2B5Jay8m3s2bIyzvp0NmDPxrSGtW2hkSpaXRH9OfuAJhqB5RdwfXm5YwBO9jeewPnvQjUTJwXXFJNcdA-R6PRsa5m403woX4rxQeL47xtzOKmUUoCLyd0sxA2YFAmZe0C-2BB3RcCY7Ekxc7Pp2q5dnXUTqvk6fIOgbda2EAJLoaDx1HNyhexgs-owJHN31UXKI8Wl_TeTw8cyRszmCCKjWUquThNvIicvw-q-ILTa0pZzYqALeYgGaxHCqGlKRrctyk38g6zUsAE5UXq98Tgu1zwQnElpe5rIYvTwn863zs7Zfp7ochsDOooaDrKuUxL8wKsRsA3ubO6M31qr7YIGMATmfxv0MqeTcFLj4hHaIuQzIGXoBBGRAE_yS7pi1rX8fF9I9G5ln_0cwcHBmhMrezKl13kAUarx4SqeuNB2HFdQ874ikVkYKgL3KIbYIdLphOH4fmGAS0ygldnvfvqZ5tZwThht4iRoGjOeKgDRW9R8pqB-8vlG6-dJv29ePiJXW--DJ1-ff8ftohlZloNbfXgWIBcNHPuG3qMDg-XpulKBHiuZITUbH8nwskRVlcfl3MtjquyyqPQZO42dGvTRIEVloE2vz9N6gHE8s809eSFEbhLTcmr-izsU0WRdM8xR-XZdbq24WIvsVFchGT3yuqbGt1DGfm6kyfrGgq4hXj5EKYVJbElMR3wRQV7TwBOpYLXa90ld2uW8isOAfsX1MboZ4mF3rLltD6tLaC1pxovg1hun095tGAC6BJ9CKngIw9USWcr6ChhrGVJpmLMHrsF",
                    "/tmp/dummyrkg42tyy"
                ],
                "command": "curl -i -X POST http://148.187.98.88:9000/test4 -F 'key=455c7c5f4910939fb502194a45d6914d/input_file' -F 'x-amz-algorithm=AWS4-HMAC-SHA256' -F 'x-amz-credential=storage_access_key/20200411/us-east-1/s3/aws4_request' -F 'x-amz-date=20200411T163746Z' -F 'policy=eyJleHBpcmF0aW9uIjogIjIwMjAtMDQtMThUMTY6Mzc6NDZaIiwgImNvbmRpdGlvbnMiOiBbeyJidWNrZXQiOiAidGVzdDQifSwgeyJrZXkiOiAiNDU1YzdjNWY0OTEwOTM5ZmI1MDIxOTRhNDVkNjkxNGQvaW5wdXRfZmlsZSJ9LCB7IngtYW16LWFsZ29yaXRobSI6ICJBV1M0LUhNQUMtU0hBMjU2In0sIHsieC1hbXotY3JlZGVudGlhbCI6ICJzdG9yYWdlX2FjY2Vzc19rZXkvMjAyMDA0MTEvdXMtZWFzdC0xL3MzL2F3czRfcmVxdWVzdCJ9LCB7IngtYW16LWRhdGUiOiAiMjAyMDA0MTFUMTYzNzQ2WiJ9XX0=' -F 'x-amz-signature=59c50f7900e136d7d7e5cf7fcf22983627bcb50b01d70c014d2b36ab3ec7a6f6' -F file=@input_file",
                "download_url": "http://148.187.98.88:9000/test4/455c7c5f4910939fb502194a45d6914d/input_file?X-Amz-Algorithm=AWS4-HMAC-SHA256&X-Amz-Credential=storage_access_key%2F20200411%2Fus-east-1%2Fs3%2Faws4_request&X-Amz-Date=20200411T163746Z&X-Amz-Expires=604800&X-Amz-SignedHeaders=host&X-Amz-Signature=fe2c2a08208a3685ac7f07807b744c06fb60eafb0e79717045f49a547672f11e",
                "key": "455c7c5f4910939fb502194a45d6914d/input_file",
                "method": "POST",
                "policy": "eyJleHBpcmF0aW9uIjogIjIwMjAtMDQtMThUMTY6Mzc6NDZaIiwgImNvbmRpdGlvbnMiOiBbeyJidWNrZXQiOiAidGVzdDQifSwgeyJrZXkiOiAiNDU1YzdjNWY0OTEwOTM5ZmI1MDIxOTRhNDVkNjkxNGQvaW5wdXRfZmlsZSJ9LCB7IngtYW16LWFsZ29yaXRobSI6ICJBV1M0LUhNQUMtU0hBMjU2In0sIHsieC1hbXotY3JlZGVudGlhbCI6ICJzdG9yYWdlX2FjY2Vzc19rZXkvMjAyMDA0MTEvdXMtZWFzdC0xL3MzL2F3czRfcmVxdWVzdCJ9LCB7IngtYW16LWRhdGUiOiAiMjAyMDA0MTFUMTYzNzQ2WiJ9XX0=",
                "url": "http://148.187.98.88:9000/test4",
                "x-amz-algorithm": "AWS4-HMAC-SHA256",
                "x-amz-credential": "storage_access_key/20200411/us-east-1/s3/aws4_request",
                "x-amz-date": "20200411T163746Z",
                "x-amz-signature": "59c50f7900e136d7d7e5cf7fcf22983627bcb50b01d70c014d2b36ab3ec7a6f6"
            },
            "source": "input_file",
            "status": "111",
            "system": "192.168.220.12:22",
            "target": "/home/test4",
            "user": "test4"
        },
        "description": "Form URL from Object Storage received",
        "hash_id": "455c7c5f4910939fb502194a45d6914d",
        "last_modify": "2020-04-11T16:37:46",
        "service": "storage",
        "status": "111",
        "task_url": "http://148.187.98.88:8000/tasks/455c7c5f4910939fb502194a45d6914d",
        "user": "test4"
    }
}
In the next step, we have to make a call outside of the FirecREST API, we have to upload the file to the staging area. We can use the command that is provided by the previous response.
Note
This action does not require the users’ credentials. It is done directly by the user or by the client, and not from FirecREST on behalf of the user.
$ curl -i \
       -X POST http://148.187.98.88:9000/test4 \
       -F 'key=455c7c5f4910939fb502194a45d6914d/input_file' \
       -F 'x-amz-algorithm=AWS4-HMAC-SHA256' \
       -F 'x-amz-credential=storage_access_key/20200411/us-east-1/s3/aws4_request' \
       -F 'x-amz-date=20200411T163746Z' \
       -F 'policy=eyJleHBpcmF0aW9uIjogIjIwMjAtMDQtMThUMTY6Mzc6NDZaIiwgImNvbmRpdGlvbnMiOiBbeyJidWNrZXQiOiAidGVzdDQifSwgeyJrZXkiOiAiNDU1YzdjNWY0OTEwOTM5ZmI1MDIxOTRhNDVkNjkxNGQvaW5wdXRfZmlsZSJ9LCB7IngtYW16LWFsZ29yaXRobSI6ICJBV1M0LUhNQUMtU0hBMjU2In0sIHsieC1hbXotY3JlZGVudGlhbCI6ICJzdG9yYWdlX2FjY2Vzc19rZXkvMjAyMDA0MTEvdXMtZWFzdC0xL3MzL2F3czRfcmVxdWVzdCJ9LCB7IngtYW16LWRhdGUiOiAiMjAyMDA0MTFUMTYzNzQ2WiJ9XX0=' \
       -F 'x-amz-signature=59c50f7900e136d7d7e5cf7fcf22983627bcb50b01d70c014d2b36ab3ec7a6f6' \
       -F file=@/path/to/file
And a successful upload would look like this:
HTTP/1.1 100 Continue

HTTP/1.1 204 No Content
Accept-Ranges: bytes
Content-Security-Policy: block-all-mixed-content
ETag: "4ad3fea0051df7b32ded6bfbdb0ced5e-1"
Location: http://148.187.98.88:9000/test4/455c7c5f4910939fb502194a45d6914d/input_file
Server: MinIO/RELEASE.2020-04-04T05-39-31Z
Vary: Origin
X-Amz-Request-Id: 1604D24BCE29D583
X-Xss-Protection: 1; mode=block
Date: Sat, 11 Apr 2020 16:56:31 GMT
Note
The testbuild is using a minio Object Storage, which is different than Swift. When you are using FirecREST the command provided by the framework might be different, but the steps the user has to follow are the same.
If everything went okay the next step is optional, but useful. You can check the status of the FirecREST task; the task id remains the same.
$ curl -X GET "${FIRECREST_IP}/tasks/455c7c5f4910939fb502194a45d6914d" \
       -H "Authorization: Bearer ${TOKEN}"
taskid = '455c7c5f4910939fb502194a45d6914d'

response = requests.get(
    url=f'{FIRECREST_IP}/tasks/{taskid}',
    headers={'Authorization': f'Bearer {TOKEN}'}
)

print(json.dumps(response.json(), indent=4))
When the transfer from Object Storage has finished, you should get a response like this:
{
    "task": {
        "data": "Download from Object Storage to server has finished",
        "description": "Download from Object Storage to server has finished",
        "hash_id": "455c7c5f4910939fb502194a45d6914d",
        "last_modify": "2020-04-11T16:58:45",
        "service": "storage",
        "status": "114",
        "task_url": "http://148.187.98.88:8000/tasks/455c7c5f4910939fb502194a45d6914d",
        "user": "test4"
    }
}
While the transfer from Object Storage to the filesystem is still ongoing the status will be “113”.
Run again the simulation with a bigger file
If you want, you can follow the same steps as before to get the SHA-1 of the file you just uploaded.
Download the output
After succesfully running our jobs we should verify that the output is what we expect. In our case we can download the output, check the result of the sha1sum command against the result we get from the file in our local machine.
The output is so small it would make sense to download it with the blocking call utilities/download, but we will do a non-blocking through the Storage microservice just so we can see the workflow in that case. It follows a similar workflow, as the non-blocking uploading of a file, as you can see in the slides that follow.
First, we have to ask FirecREST to transfer the file from the machine’s filesystem to the staging area. As soon as the transfer is complete we have to ask FirecREST for the link from where we can download the file.
The first step is a call to the /storage/xfer-external/download endpoint. We only pass the authorization token and the location of the file to the call. Remember that the output of the job is inside the firecrest directory in our case.
$ curl -X POST "${FIRECREST_IP}/storage/xfer-external/download" \
       -H "Authorization: Bearer ${TOKEN}" \
       -F "sourcePath=/home/test4/firecrest/af516f55496faf473d3bcaa042c52431/res.txt"
sourcePath = '/home/test4/firecrest/af516f55496faf473d3bcaa042c52431/res.txt'

response = requests.post(
    url=f'{FIRECREST_IP}/storage/xfer-external/download',
    headers={'Authorization': f'Bearer {TOKEN}'},
    data={'sourcePath': sourcePath}
)

print(json.dumps(response.json(), indent=4))
And the response will only give us the task ID of the task we just created.
{
    "success": "Task created",
    "task_id": "20372784765d7fa4f6b9090f82d3af86",
    "task_url": "http://148.187.98.88:8000/tasks/20372784765d7fa4f6b9090f82d3af86"
}
$ curl -X GET "${FIRECREST_IP}/tasks/20372784765d7fa4f6b9090f82d3af86" \
       -H "Authorization: Bearer ${TOKEN}"
taskid = '20372784765d7fa4f6b9090f82d3af86'

response = requests.get(
    url=f'{FIRECREST_IP}/tasks/{taskid}',
    headers={'Authorization': f'Bearer {TOKEN}'}
)

print(json.dumps(response.json(), indent=4))
After it finishes you should get a response like this:
{
    "task": {
        "data": "http://148.187.98.88:9000/test4/20372784765d7fa4f6b9090f82d3af86/res.txt?X-Amz-Algorithm=AWS4-HMAC-SHA256&X-Amz-Credential=storage_access_key%2F20200411%2Fus-east-1%2Fs3%2Faws4_request&X-Amz-Date=20200411T172209Z&X-Amz-Expires=604800&X-Amz-SignedHeaders=host&X-Amz-Signature=07d4b7b00915077567029354829794ce0a54efec9ee42bbfed486560e2cd4661",
        "description": "Upload from filesystem to Object Storage has finished succesfully",
        "hash_id": "20372784765d7fa4f6b9090f82d3af86",
        "last_modify": "2020-04-11T17:22:09",
        "service": "storage",
        "status": "117",
        "task_url": "http://148.187.98.88:8000/tasks/20372784765d7fa4f6b9090f82d3af86",
        "user": "test4"
    }
}
And you can download the file from the link in the “data” field and compare to the result you get locally.
Transfer data between filesystems
Sometimes we simply need to transfer files between two filesystems of the system. FirecREST supports this workflow by creating the job scripts and submitting the job to the workload manager.
Here is an example for this:
$ curl -X POST "${FIRECREST_IP}/storage/xfer-internal/cp" \
       -H "Authorization: Bearer ${TOKEN}" \
       -F "sourcePath=/home/test4/firecrest/af516f55496faf473d3bcaa042c52431/res.txt" \
       -F "targetPath=/home/test4/my_results.txt"
sourcePath = '/home/test4/firecrest/af516f55496faf473d3bcaa042c52431/res.txt'
targetPath = '/home/test4/my_results.txt'

response = requests.post(
    url=f'{FIRECREST_IP}/storage/xfer-internal/cp',
    headers={'Authorization': f'Bearer {TOKEN}'},
    data={'targetPath': targetPath,
          'sourcePath': sourcePath}
)

print(json.dumps(response.json(), indent=4))
The response is going to be similar to the one when we submit a job with FirecREST. We are going to get back a task ID and though this we can follow the status of the task. In order to track the result of the transfer we would need to poll and check the output of the submitted job.
Besides cp, FirecREST also supports templates for rsync, mv and rm jobs.